| I was recently asked by a client interested in introducing the bokashi fermenting system to her garden if it was challenging to create her own bran. |
| First off, what is Bokashi Bran? Bokashi bran is a key ingredient in a composting method called Bokashi composting. Unlike traditional composting, which relies on oxygen and decomposition, Bokashi is an anaerobic (oxygen-free) fermentation process. The bran is made by mixing wheat bran (or another type of bran) with a blend of beneficial microbes—usually lactic acid, yeast, and phototrophic bacteria—and then letting that mixture ferment and dry. The result is a dry, slightly sweet-and-sour-smelling bran that can be stored and used over time. When you sprinkle bokashi bran over food scraps in a sealed container (called a Bokashi bucket), the microbes break down the material. They don’t decompose it like outdoor composting; instead, they ferment it. This means the scraps don’t rot or smell bad—they pickle. After the bucket is complete and has had some time to ferment, the contents can be buried in soil, where they finish breaking down quickly and enrich the earth with nutrients. In short, bokashi bran is the microbe-packed “activator” that makes this system work. Without it, you’re just tossing scraps in a bucket. With it, you’re fermenting food waste clean, efficient, and soil-friendly. |
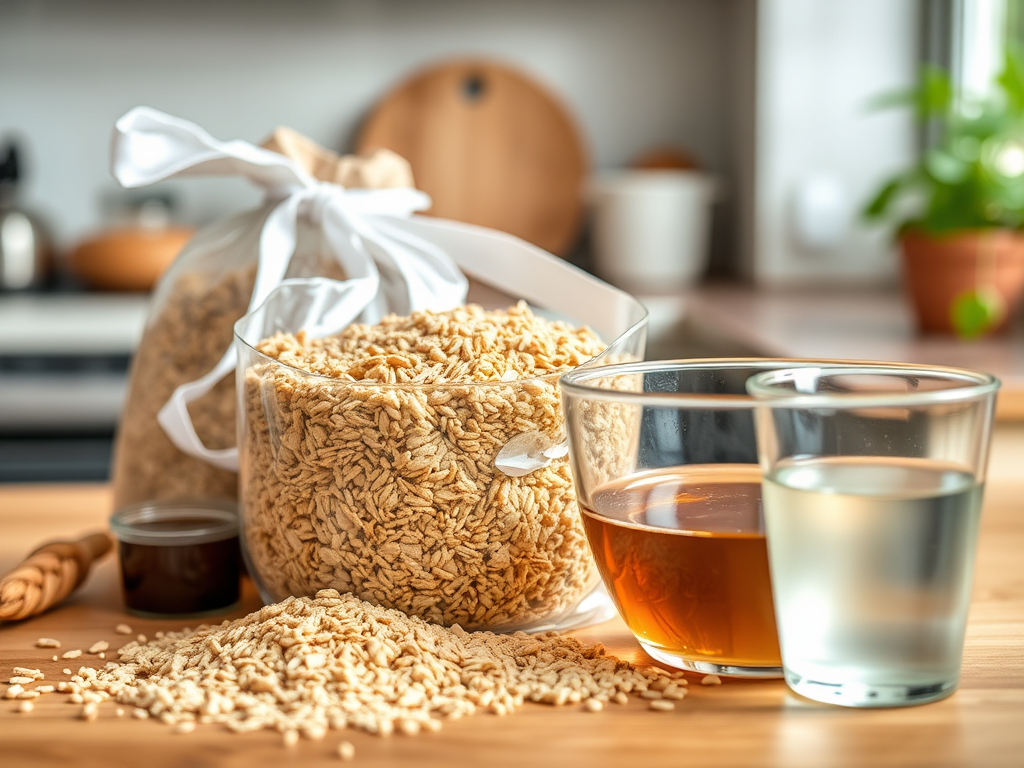
| How to Make Your Own Bokashi Bran: A Sustainable Solution for Your Kitchen Ingredients: 10 cups wheat bran (or rice bran, sawdust, or coffee grounds) 1 cup non-chlorinated water 2 tablespoons molasses 2 tablespoons EM-1 microbial solution Instructions: Mix water, molasses, and EM-1 in a bowl Pour slowly over the bran, mixing as you go You want it damp like breadcrumbs, not wet Seal tightly in a ziplock bag or airtight bucket Store in a warm, dark place for 2–3 weeks (white mould = good) Once fermented, dry it out completely and store it in a container |
| What Do You Needto Dry it Out Completely: A flat, dry surface (like a tarp, baking trays, or large trays) A warm, ventilated space (a sunny spot outside, a garage, or even indoors if needed) Time and patience Step-by-Step: Break It Up: Right after mixing your bran with EM and molasses solution, it’s going to be damp. Spread it out as evenly as possible in a thin layer. The thinner the layer, the faster it dries. Air It Out: If you’re doing this indoors, use a fan to get air moving around the bran. Good airflow is key. Outdoors, make sure it’s not humid or rainy — sunshine is your best friend here. Stir Occasionally: Every few hours (or at least once a day), mix it up with your hands or a rake to expose damp spots and let them dry out too. This also prevents any unwanted mold from growing. Check for Dryness: You’ll know it’s dry when it feels totally crumbly, not sticky or cool to the touch. Pick up a handful and squeeze — it should not clump or feel damp at all. Store It Right: Once fully dry, seal it up in an airtight container or bag. Keep it out of the sun and away from moisture. Tips: Don’t rush it. If you store it while it’s even a little damp, it can go moldy. If it’s humid where you live, using a dehydrator on the lowest setting or an oven on warm (below 100°F/38°C) with the door cracked open can help finish the job. |

One thought on “Creating Bokashi Bran: A Step-by-Step Guide”